When it comes to the pantheon of iconic American desserts, the classic banana pudding holds a place of high honor. This isn’t just a simple bowl of custard; it is a structural masterpiece of contrasting textures, ranging from the snap of a golden wafer to the silkiness of a slow-cooked vanilla bean cream. The visual appeal of this dessert is as important as its flavor, requiring a translucent glass vessel to showcase the architectural beauty of its components.
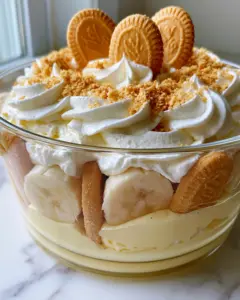
Imagine a clear trifle dish where every layer is a testament to culinary precision. You see the vibrant white centers of perfectly sliced bananas, the pale cream hue of a thick pudding flecked with real vanilla bean, and the crowning glory of a stiff-peaked whipped cream cloud. This classic banana pudding is designed to be the centerpiece of your table, capturing the soft, natural light of a lazy afternoon and promising a nostalgic journey in every spoonful.

Why You Will Love This Gourmet Layered Masterpiece
- Textural Harmony: We achieve a perfect balance between the crunch of golden vanilla wafers and the velvety, thick consistency of a professional-grade custard.
- Visual Precision: By following our specific slicing and assembly techniques, you will maintain the bright yellow exterior and vibrant white centers of the bananas without a hint of browning.
- Gourmet Flavor Profile: Unlike instant mixes, this version utilizes real vanilla bean paste to provide those characteristic tiny black specks and a deep, floral aroma.
- High-Definition Layers: The recipe is engineered to stay structurally sound, ensuring your trifle dish displays clean, defined boundaries between the pudding, fruit, and cream.
The Elements of a Perfect Classic Banana Pudding
To achieve the specific visual and flavor profile described in our blueprint, every ingredient must serve a structural and aesthetic purpose. We do not use “short-cut” ingredients; we build flavor from the ground up.
Whole Milk (720ml / 3 cups): This provides the liquid base for our custard, offering enough fat content to create a rich mouthfeel without being overly heavy. Use cold milk to ensure the cornstarch dissolves properly before heating.
Heavy Cream (480ml / 2 cups): Split between the pudding and the topping, the cream is essential for those “pillowy clouds” and “stiff peaks” mentioned in our visual prompt. High-fat content is non-negotiable for stable whipped cream.
Granulated Sugar (200g / 1 cup): Sweetness is necessary, but sugar also aids in the caramelization of the pudding’s flavor and helps stabilize the egg yolks during the tempering process.
Egg Yolks (4 large): The yolks provide the “pale cream color” and the emulsifying power needed to make the pudding thick and velvety. They add a necessary golden richness that mirrors the vanilla wafers.
Cornstarch (40g / 5 tbsp): This is our thickening agent that ensures the pudding doesn’t run, allowing those layers to remain “beautifully defined” in the glass dish.
Vanilla Bean Paste (2 tsp / 10ml): For the gourmet look, paste is superior to extract as it provides the visible vanilla seeds that signify a high-end, scratch-made dessert.
Unsalted Butter (30g / 2 tbsp): Whisked in at the very end, butter adds a glossy sheen to the pudding and a rounded, professional finish to the flavor profile.
Fresh Yellow Bananas (5-6 large): Select bananas that are perfectly yellow with no brown spots on the skin. This ensures the slices have the “vibrant white centers” required for the pristine visual appearance.
Vanilla Wafers (1 box, approx. 310g): You need these for the crisp base and the “golden vanilla wafer crumbs” that garnish the top. They act as the structural floor for each layer.
The Professional Kitchen Kit: Tools for Success
To replicate the handheld smartphone photo aesthetic of a gourmet dessert, you need the right vessels and tools. The clear glass trifle dish is the most important piece of equipment for this classic banana pudding.
A heavy-bottomed saucepan is required to prevent the milk from scorching as you thicken the pudding. You will also need a fine-mesh sieve to strain the custard, ensuring it is “velvety” and free of any tiny cooked egg bits. A stand mixer or electric hand mixer is vital for achieving those “stiff peaks” in the whipped cream, providing the volume needed for a generous top layer.
For the bananas, a sharp mandoline or a chef’s knife is necessary to create “neatly sliced rounds” of uniform thickness. Finally, a silicone spatula will help you fold the whipped cream and scrape every bit of the vanilla bean pudding into the dish without disturbing the pristine layers below.
Step 1: Crafting the Velvety Vanilla Bean Pudding
Start by whisking the sugar, cornstarch, and a pinch of salt in your heavy-bottomed saucepan. Slowly pour in the whole milk and half of the heavy cream, whisking constantly to ensure no lumps of starch remain. Place the pan over medium heat.
In a separate bowl, lightly beat the egg yolks. As the milk mixture begins to steam and show tiny bubbles around the edges (the “scald” stage), take a ladle of the hot liquid and slowly drizzle it into the egg yolks while whisking vigorously. This is called tempering; it prevents the eggs from scrambling when they hit the heat.
Pour the tempered egg mixture back into the saucepan. Continue to cook over medium-low heat, whisking constantly. You are looking for a specific visual cue: the mixture will transform from a thin liquid to a thick, glossy cream that coats the back of a spoon. Once it reaches a thick, pudding-like consistency, remove from heat and stir in the vanilla bean paste and butter.
Pass the pudding through a fine-mesh sieve into a clean bowl. This ensures the texture is perfectly smooth. Cover the surface directly with plastic wrap (to prevent a skin from forming) and refrigerate until completely chilled and set, at least 4 hours or overnight.

Step 2: Preparing the Crisp Wafers and Pristine Bananas
While the pudding chills, prepare your dry components. Reserve about 10-12 whole vanilla wafers for the base layer and another 5-6 to be crushed into “golden vanilla wafer crumbs” for the final garnish. The remaining cookies will be used for the internal layering.
Timing is everything for the bananas. To maintain those “vibrant white centers” and ensure there is “absolutely no browning,” do not slice the bananas until you are ready to assemble the trifle. When ready, peel the bright yellow bananas and slice them into 1/4 inch (6mm) rounds. If you are worried about oxidation, a very light mist of lemon juice can help, though fresh assembly is the best defense.
If you enjoy exploring different variations of this dessert, you might also be interested in our Magnolia Bakery style version or perhaps a decadent banana pudding cheesecake for your next event.
Step 3: Whipping the Pillowy Cream Cloud
In a chilled metal bowl, combine the remaining heavy cream with a tablespoon of powdered sugar and a splash of vanilla. Use your mixer to beat the cream on medium-high speed. Watch closely as the liquid thickens.
You are looking for “stiff peaks.” This means when you lift the whisk, the cream stands straight up without drooping. This stability is crucial so the cream sits like a “generous pillowy cloud” on top of the classic banana pudding without deflating into the custard below. Do not overbeat, or the cream will become grainy and turn toward butter.
Step 4: Architecting the Layers in the Trifle Dish
Now, we begin the assembly in the clear glass dish. Start with a foundation of whole, crisp golden vanilla wafers at the very bottom. This provides a crunch that contrasts with the soft layers above. Top the wafers with a layer of the chilled vanilla bean pudding, spreading it to the very edges of the glass to create a defined line.
Next, place a neat layer of banana slices. Press some of the slices vertically against the glass so they are visible from the outside—this is the secret to that gourmet, professional look. Repeat the layers: wafers, pudding, and bananas, until you reach the top of the dish.
Finish the classic banana pudding with the generous cloud of whipped cream. Use a spatula to create soft swirls and peaks. Finally, sprinkle the golden wafer crumbs over the center and garnish with three elegant banana slices, placed just before serving to ensure they remain perfectly white.
Expert Tips for Picture-Perfect Results
- Temperature Control: Ensure your pudding is completely cold before assembling. Warm pudding will melt the whipped cream and soften the wafers too quickly, destroying the defined layers.
- The Snap Test: For the best texture, serve the pudding within 4-6 hours of assembly. This allows the wafers to soften slightly into a cake-like consistency while still retaining a bit of their structural “snap.”
- Banana Selection: Avoid overripe bananas with brown spots for the layers. While great for banana muffins, they are too soft and brown too quickly for a visual trifle.
- Clean Glass: Before starting your assembly, wipe the inside of your trifle dish with a bit of lemon juice or vinegar on a paper towel to remove any streaks or fingerprints.
Storage and Freshness Guidelines
The classic banana pudding is best enjoyed the day it is made. However, you can store leftovers in the refrigerator for up to 2 days. Cover the dish tightly with plastic wrap to prevent the bananas from oxidizing and the cream from absorbing fridge odors.
Note that the wafers will continue to soften the longer they sit in the pudding. While some people prefer this “cake-like” texture, the visual definition of the layers will begin to blur after 24 hours. This dessert does not freeze well, as the custard will weep and the bananas will become mushy upon thawing.
What to Serve With This Southern Delight
This rich and creamy dessert is the perfect conclusion to a hearty meal. It shines especially well as part of a Labor Day party food spread or at any outdoor summer gathering. Because it is a no-bake dessert, it is ideal for hot months when you don’t want to turn on the oven.
If you are hosting a large gathering, consider pairing it with other seasonal treats like summer fruit pies or a refreshing beverage. The creamy vanilla notes of the pudding also pair beautifully with a cup of dark roast coffee or a light dessert wine.
Common Questions About Homemade Pudding
Yes, you can substitute 1:1, but you will miss the characteristic gourmet black specks and the deep floral intensity that vanilla bean paste provides to the pale cream custard.
To prevent browning, use bananas that are just ripe (yellow with no spots). Assemble the pudding shortly before serving, and ensure the banana slices are fully submerged or covered by the pudding to block air exposure.
For a ‘classic’ texture where wafers are soft but not mushy, 4 to 6 hours of chilling is ideal. For those who like a crunchier wafer, serve within 2 hours of assembly.
Scratch-made pudding is superior for layering because it has a higher structural stability and a thicker, more velvety texture that holds the weight of the bananas and wafers without collapsing.
Pudding is usually runny if the cornstarch wasn’t cooked long enough to activate its thickening properties or if the egg yolks weren’t tempered properly. Ensure the mixture reaches a thick, spoon-coating consistency before chilling.
The Official Classic Banana Pudding Recipe Card

Classic Banana Pudding Recipe with Velvety Vanilla Bean Layers
Ingredients
Equipment
Method
- In a saucepan, whisk sugar, cornstarch, milk, and 1 cup (240ml) of cream. Heat over medium until steaming.
- Slowly whisk a ladle of hot milk into egg yolks, then return the mixture to the pan. Cook until thick and glossy.
- Stir in vanilla paste and butter. Strain through a sieve and chill with plastic wrap touching the surface for 4+ hours.
- Beat remaining chilled heavy cream until stiff peaks form.
- In a glass dish, layer wafers, chilled pudding, and fresh banana slices. Repeat until full.
- Top with whipped cream, vanilla wafer crumbs, and fresh banana slices.
Notes
Strain the pudding while hot to ensure it is perfectly velvety.

Final Thoughts and Community Sharing
Mastering the classic banana pudding is a rite of passage for any home baker. It is a dish that relies on the quality of simple ingredients and the patience of the cook. When you pull that clear glass dish from the fridge and see those pristine, defined layers, you’ll know the effort was worth it.
We would love to see your culinary creations! If you make this recipe, please leave a comment below and share your photos. Don’t forget to pin this recipe to your favorite boards on Pinterest so you can find it for your next holiday or family gathering. Happy cooking!