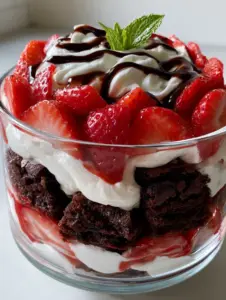
There is something inherently magical about a strawberry brownie trifle catching the soft, natural morning side-light on a kitchen counter. This isn’t just a dessert; it is a visual symphony of textures, from the dense, fudgy chocolate brownie chunks to the velvety peaks of homemade whipped cream. Whether you are hosting a summer soirée or a cozy family gathering, this handheld-style glass bowl masterpiece is designed to be the center of attention.
The beauty of a strawberry brownie trifle lies in its contrast. You have the deep, dark richness of the chocolate competing with the vibrant, glossy acidity of fresh red strawberries. When you dip a spoon through those clearly defined layers, you get the perfect mouthful of crunch, cream, and fruit. It is an indulgent experience that looks professional yet feels wonderfully rustic and approachable for any home cook.

Why This Layered Chocolate Strawberry Masterpiece Works
- Textural Harmony: The combination of rich, dense, fudgy chocolate brownie chunks and fluffy velvety whipped cream creates a mouthfeel that is both heavy and light.
- Visual Precision: By using a clean glass bowl, the vibrant, glossy sliced fresh strawberries create a stunning ruby-red perimeter that pop against the dark chocolate.
- Make-Ahead Magic: This dessert actually benefits from a few hours in the fridge, allowing the brownie edges to slightly soften into the cream.
- Balanced Sweetness: The dark chocolate drizzle on top adds a sophisticated bitterness that cuts through the sugar of the cream and berries.
The Anatomy of the Perfect Strawberry Brownie Trifle
To achieve the specific “forensic” look of this dessert, we need to focus on the quality of our building blocks. Each component must be sturdy enough to stack without collapsing into a muddy mess. While you can use a boxed mix, I highly recommend starting with a base similar to my rich peanut butter brownies (minus the peanut butter) for that specific fudgy density shown in the photos.
Fudgy Chocolate Brownies: We use 1 cup (225g) of unsalted butter and 2 cups (400g) of granulated sugar to create that classic crackly top and dense center. The cocoa powder provides the “rich, dense” structure required to hold up under the weight of the cream layers.
Fresh Red Strawberries: You will need 2 lbs (900g) of vibrant, glossy strawberries. Slicing them uniformly is the secret to those “clearly defined layers” you see in professional food photography.
Velvety Whipped Cream: 2 cups (480ml) of heavy whipping cream, chilled. We stabilize this with 1/2 cup (60g) of powdered sugar and 1 tsp (5ml) of vanilla extract to ensure it maintains its “fluffy” integrity for hours.
Dark Chocolate Drizzle: A simple ganache made of 1/2 cup (90g) dark chocolate chips and 2 tbsp (30ml) heavy cream. This provides the “glossy” finish that catches the light so beautifully.
Foundational Additions: Don’t forget 1/2 tsp (3g) of fine sea salt and 1 tbsp (15g) of high-quality espresso powder. These “invisible” ingredients don’t change the color, but they intensify the chocolate flavor to an elite level.
Essential Equipment for a Professional Presentation
To replicate the smartphone photo look, you don’t need fancy cameras, but you do need the right vessel. A straight-sided glass trifle bowl or a large clear glass salad bowl is essential. This allows the layers of fudgy brownie and white cream to be visible from every angle.
You will also want a sharp chef’s knife for clean strawberry slices. Ragged edges will bleed juice into the cream, ruining the “vibrant, glossy” appearance. Finally, a high-speed hand mixer or stand mixer is non-negotiable for achieving that specific velvety whipped cream texture that holds its peaks without weeping.

Step-by-Step Construction of the Trifle
Creating the Fudgy Brownie Foundation
Preheat your oven to 350°F (175°C). Melt your butter and whisk in the sugar and cocoa powder until the mixture looks like wet sand. Add 3 large eggs one at a time, whisking vigorously until the batter becomes glossy and pulls away from the sides of the bowl—this is the secret to the “dense, fudgy” texture.
Fold in 1 cup (125g) of all-purpose flour and your salt. Bake in a parchment-lined 9×9 inch (23x23cm) pan for 25-30 minutes. The visual cue for readiness is a slight wobble in the center but set edges. Once cooled completely, cut into 1-inch (2.5cm) cubes. Using cold brownies makes the layering process much cleaner.
Prepping the Vibrant Fruit and Fluffy Cream
Wash your strawberries and pat them completely dry. This is a critical culinary step; moisture on the berries will cause the whipped cream to deflate. Slice the berries into 1/4-inch (6mm) thick rounds. If your berries are tart, you can toss them with a tablespoon of homemade strawberry sauce for extra gloss, but for this specific visual prompt, fresh and dry is best.
In a chilled bowl, whip the heavy cream, powdered sugar, and vanilla. Look for the “velvety” stage—where the whisk leaves clear tracks in the cream, but the peaks are soft and supple rather than stiff and grainy.
The Art of Layering for Maximum Visual Impact
Start with a single layer of the fudgy brownie chunks at the bottom of the glass bowl. Follow with a generous layer of whipped cream, using a spatula to push the cream all the way to the edges of the glass. This “seals” the layer and prevents the next layer of brownies from falling down the sides.
Press the sliced strawberries vertically against the glass wall before filling the center with more berries. This ensures the “vibrant, glossy” fruit is the first thing people see. Repeat these steps until you reach the top of the bowl, finishing with a smooth, fluffy layer of cream.
The Final Flourish: Drizzle and Garnish
Melt your dark chocolate and cream together in 20-second bursts in the microwave until smooth. Using a spoon, create a light, delicate drizzle across the top layer of cream. To match the Midjourney prompt exactly, place a single, perfectly formed fresh mint leaf in the center. The green against the chocolate and white cream provides the final “pop” of color that defines the “morning side-light” aesthetic.
Expert Tips for Trifle Success
- The “Clean Glass” Rule: Use a paper towel dipped in lemon juice to wipe away any cream smudges on the inside of the glass as you layer. This keeps the “clearly defined layers” sharp.
- Temperature Control: Never layer warm brownies. The heat will melt the fat in the whipped cream, turning your trifle into a chocolate soup.
- Berry Selection: Choose strawberries that are red all the way to the top. White “shoulders” on the berries will make the trifle look unripened and less “vibrant.”
- Stability Secret: If you are making this for a summer gathering, add 1 tbsp of instant vanilla pudding mix to your whipped cream. It acts as a stabilizer that keeps the cream fluffy for 24 hours.
Storage and Serving Suggestions
This strawberry brownie trifle is best served after it has chilled for at least 2 hours. This allow the flavors to meld. It can be stored in the refrigerator for up to 2 days. However, be aware that the brownies will continue to absorb moisture from the cream, becoming softer over time.
I do not recommend freezing this dessert, as the fresh strawberries will become mushy and the whipped cream will lose its velvety texture upon thawing. If you have leftovers, they make for an incredible “dessert breakfast” the next morning!
What to Pair with Your Trifle
While this is a standalone star, it pairs beautifully with other festive treats. If you are serving this during the holidays, consider a festive brownie platter on the side. For a summer event, these layers go perfectly alongside classic shortcake biscuits.
If you want to lean into the “party” aspect, a seasonal margarita or even a light sparkling wine provides the perfect acidic balance to the rich, fudgy chocolate and sweet cream.
Frequently Asked Questions
Yes, you can use a boxed mix. However, ensure you bake them to a ‘fudgy’ rather than ‘cakey’ consistency to ensure the layers hold up under the weight of the cream and fruit.
Frozen strawberries are not recommended for the visible layers as they release too much liquid upon thawing. They are better suited for a cooked sauce layer.
The secret is to pat the strawberries completely dry with a paper towel after washing and slicing. Any residual water will cause the cream to break down and turn pink.
You can assemble the trifle up to 6 hours before serving. If you need more time, stabilize the whipped cream with a little bit of instant pudding mix or gelatin.
Chill your baked brownies in the refrigerator for at least 2 hours before cutting. Use a sharp, slightly warm knife to get clean, non-crumbly chunks.
The Ultimate Strawberry Brownie Trifle Recipe


Strawberry Brownie Trifle: The Ultimate Fudgy Chocolate and Fresh Berry Layered Dessert
Ingredients
Equipment
Method
- Whisk melted butter, sugar, and cocoa powder. Add eggs one at a time until the batter is glossy and thick.
- Fold in flour and salt. Bake at 350°F (175°C) for 25-30 minutes. Cool completely and cut into 1-inch cubes.
- Beat heavy cream, powdered sugar, and vanilla until velvety soft peaks form.
- Wash, dry, and slice strawberries into uniform 1/4-inch rounds.
- Layer brownie chunks at the bottom, followed by cream, and then a ring of strawberries against the glass. Repeat until full.
- Melt dark chocolate with cream and drizzle over the top. Add a single mint leaf for the final touch.
Notes
Wipe the inside of the glass with a paper towel between layers for a professional, clean look.
Closing & Call to Action
The strawberry brownie trifle is a testament to the fact that simple ingredients, when treated with professional technique and a keen eye for visual detail, can create something truly extraordinary. The combination of dense chocolate and bright fruit is a timeless classic for a reason.
If you enjoyed this recipe, please leave a comment below and let me know how your layers turned out! Don’t forget to follow me on Pinterest for more culinary inspiration. Pin the image below to save this recipe for your next big celebration!