There is nothing quite like the nostalgic aroma of a toasted marshmallow over an open flame, but we are elevating that childhood memory into a sophisticated, decadent s’mores cheesecake. This isn’t your average airy dessert; we are crafting a professional-grade bar that features a thick, crumbly graham cracker base and a velvety chocolate interior.
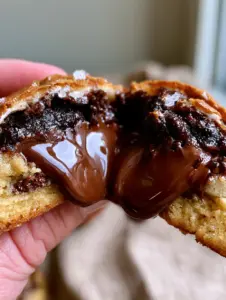
Imagine biting into a layer of charred, gooey marshmallow fluff that gives way to a dense dark chocolate cream cheese filling. This recipe is designed to bridge the gap between a rustic campfire snack and a high-end pastry shop offering, ensuring every slice looks as stunning as a professional food photograph.
Whether you are hosting a summer backyard bash or looking for a cozy winter indulgence, these bars deliver a multi-sensory experience. From the audible crunch of the graham crust to the sight of those perfectly golden-brown marshmallow peaks, this is the definitive guide to mastering the art of the s’mores cheesecake.

Why This Decadent S’mores Cheesecake Recipe Works
- Structural Integrity: The crust is engineered to be crumbly yet firm enough to hold the weight of the dense chocolate filling without collapsing.
- Visual Contrast: The stark white marshmallow fluff against the deep, dark chocolate creates a striking aesthetic that is perfect for social media sharing.
- Textural Harmony: We combine the “snap” of mini chocolate chips, the “goo” of toasted fluff, and the “velvet” of the cream cheese for a complete mouthfeel.
- Advanced Flavor Profile: By using dark chocolate instead of standard milk chocolate, we balance the extreme sweetness of the marshmallow topping.
The Foundation: Essential Elements for the Perfect Bar
To achieve the result seen in high-end culinary photography, you cannot simply throw ingredients together. Every component in this s’mores cheesecake serves a specific structural and visual purpose.
Graham Cracker Crumbs: 1.5 cups (150g). These provide the essential sandy texture and honeyed flavor profile that defines the classic s’more base.
Unsalted Butter (Melted): 6 tbsp (85g). This acts as the “glue” for your crust, ensuring it holds together while remaining crumbly enough to melt in your mouth.
Full-Fat Cream Cheese: 16 oz (450g). You must use room-temperature, full-fat blocks to achieve the dense, velvety texture required for this specific cheesecake style.
Dark Chocolate (60% Cacao): 8 oz (225g). Melting real chocolate into the batter, rather than just using cocoa powder, provides the “dense” filling characteristic seen in the blueprint.
Marshmallow Fluff: 7 oz (198g) jar. This is the key to those iconic “charred peaks” as it holds its shape better than standard melted marshmallows under a torch.
Mini Chocolate Chips: 1/2 cup (90g). These are folded in and used as a garnish to add a secondary hit of chocolate and a slight textural variation.
Granulated Sugar: 1/2 cup (100g). Essential for sweetening the cream cheese while assisting in the aeration process during the initial mixing phase.
Large Eggs: 2 units. Eggs provide the structural protein that allows the cheesecake to set into a sliceable bar format.
Sour Cream: 1/4 cup (60ml). This adds a subtle tang that cuts through the richness and contributes to the “velvety” finish of the dark chocolate layer.
Professional Tools for Culinary Success
To replicate the “perfectly charred golden peaks” and “dense chocolate filling” described in the visual blueprint, having the right equipment is non-negotiable. You will need a 9×9 inch (23x23cm) square baking pan lined with parchment paper for easy removal.
A culinary butane torch is the preferred method for charring the marshmallow topping, as it offers precision control that a standard oven broiler cannot match. Furthermore, an offset spatula is vital for swirling the fluff into those artistic peaks before you apply the heat.
Building the Crumbly Graham Cracker Foundation
The first step in any elite s’mores cheesecake is a robust base. If you are looking for more inspiration on crust variations, check out these s’mores hacks for creative twists on the classic recipe.
Preheat your oven to 325°F (163°C). Combine your graham crumbs, melted butter, and a pinch of salt in a bowl. Mix until the texture resembles wet sand—it should hold its shape when squeezed in your palm.
Press the mixture firmly into the bottom of your lined pan. Use the bottom of a flat measuring cup to ensure the crust is even and compact. Bake for 10 minutes until fragrant and slightly golden, then set aside to cool while you prepare the chocolate center.

Creating the Velvety Dark Chocolate Filling
This is where the magic happens. Unlike a standard homemade cheesecake, we are incorporating melted dark chocolate directly into the batter to ensure a deep, uniform color and a fudge-like density.
Melt your dark chocolate in a microwave-safe bowl in 30-second intervals, stirring until smooth. In a separate large bowl, beat the cream cheese and sugar until completely smooth. It is critical to scrape the sides of the bowl to avoid any white lumps in your dark filling.
Add the eggs one at a time, followed by the sour cream and the melted chocolate. Gently fold in half of the mini chocolate chips. Pour this luscious mixture over your pre-baked crust, smoothing the top with your offset spatula.
Baking for Optimal Density
Bake the cheesecake for 35-40 minutes. You are looking for a specific sensory cue: the edges should be set, but the center should still have a slight “jiggle” when shaken. This ensures the s’mores cheesecake remains dense and velvety rather than dry and crumbly.
Once baked, allow the bars to cool to room temperature before refrigerating for at least 4 hours. This chilling phase is mandatory. It allows the fats in the chocolate and cream cheese to solidify, creating that professional, clean-cut slice.
Achieving the Iconic Toasted Marshmallow Topping
Once your cheesecake is fully chilled and set, it is time for the final visual flourish. Spread the marshmallow fluff generously across the top of the chocolate layer. Use the back of a spoon to pull the fluff upward, creating the “peaks” described in our visual blueprint.
Using your kitchen torch, sweep the flame across the fluff in a circular motion. Watch for the marshmallow to transition from stark white to a deep golden brown. The goal is “charred peaks” with gooey, soft centers. This contrast is the hallmark of a high-quality s’mores cheesecake.
Immediately after torching, sprinkle the remaining mini chocolate chips and a handful of crushed graham crackers over the top. This adds the final layer of garnish that makes the dish look like a professional food styling project.
Expert Tips for the Ultimate S’mores Experience
- Room Temperature Ingredients: Always ensure your cream cheese and eggs are at room temperature to prevent a lumpy batter.
- The Clean Cut: To get those perfect sharp edges seen in our photos, dip your knife in hot water and wipe it clean between every single cut.
- Prevent Cracking: Avoid over-beating the eggs, which incorporates too much air. Excess air causes the cheesecake to rise and then collapse, leading to cracks.
- Storage Wisdom: If you aren’t serving immediately, wait to torch the marshmallow until just before presentation to maintain the best texture.
What to Serve With Your Cheesecake Bars
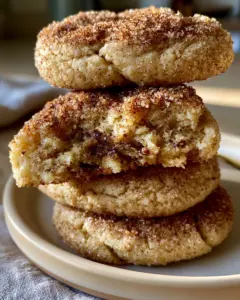
While these bars are a star on their own, they pair beautifully with other seasonal treats. If you’re hosting a dessert bar, consider adding pumpkin cheesecake balls for a fall vibe or snickerdoodle cheesecake bars for a cinnamon-spiced contrast.
For a refreshing beverage pairing that cuts through the richness, a cold glass of milk is classic, or you could lean into the party atmosphere with a holiday margarita if serving these during a festive gathering.
Frequently Asked Questions
Yes, you can use your oven’s broiler, but watch it extremely closely as marshmallow fluff burns in seconds. For the best ‘charred peaks,’ a torch is highly recommended for control.
You can, but fluff provides the ‘gooey peaks’ look. If using whole marshmallows, cut them in half and place them cut-side down before torching to help them adhere to the chocolate layer.
The secret is the butter-to-crumb ratio and compression. Ensure the crumbs are well-moistened and press them down firmly using a flat-bottomed cup before pre-baking.
These bars can be stored in an airtight container in the refrigerator for up to 5 days. For best texture, add and torch the marshmallow topping just before serving.
Graininess usually occurs if the melted chocolate was too hot when added to cold cream cheese. Ensure all ingredients are at room temperature to maintain a smooth emulsion.
Mastering the S’mores Cheesecake Recipe

S’mores Cheesecake Bars: The Ultimate Dense Dark Chocolate Campfire Treat
Ingredients
Equipment
Method
- Combine graham cracker crumbs, melted butter, and salt. Press firmly into a lined 9x9 pan and bake at 325°F (163°C) for 10 minutes. Cool completely.
- Beat cream cheese and sugar until smooth. Melt dark chocolate and stir into the mixture. Add eggs and sour cream, mixing until velvety. Fold in half of the mini chips.
- Pour over crust and bake for 35-40 minutes until edges are set but the center remains jiggly. Chill for at least 4 hours.
- Spread marshmallow fluff over chilled bars, creating peaks with a spoon. Use a kitchen torch to char the peaks until golden brown. Sprinkle with remaining chips and crumbs.
Notes
For clean slices, wipe your knife with a hot, damp cloth between every cut.

Final Thoughts on the Perfect S’mores Indulgence
Creating the perfect s’mores cheesecake is about the balance of textures and the precision of the char. By following this guide, you’ve moved beyond simple baking and into the realm of culinary artistry. These bars are a guaranteed showstopper for any occasion.
Did you manage to get those perfectly charred peaks? We want to see your results! Leave a comment below, sign up for our newsletter for more elite recipes, and be sure to share your creations to Pinterest so others can enjoy this campfire classic elevated.