The search for the perfect peanut butter brownie recipe ends here, where deep, dark cocoa meets a glossy, molten ribbon of creamy nut butter. There is something fundamentally transformative about the way a salty peanut butter swirl cuts through the intense richness of a high-quality chocolate brownie.
Imagine biting into a square that is thick, ultra-fudgy, and boasts a delicate, paper-thin shiny crinkle crust that shatters under your teeth. This isn’t just a dessert; it is a masterclass in texture, combining a gooey chocolate center with the crunch of roasted peanuts and the spark of flaky sea salt.
Whether you are baking for a crowd or looking for the ultimate late-night indulgence, this recipe delivers a professional-grade result that looks exactly like a high-end bakery display. Let’s dive into the culinary science of achieving that perfect “ribbon” and the elusive shiny top.

Why This Decadent Peanut Butter Brownie Recipe Outperforms the Rest
- The Crinkle Factor: We utilize a specific sugar-to-egg aeration technique to ensure every batch has that professional, shiny, tissue-paper-thin crust.
- Visual Contrast: The warm, glossy peanut butter ribbon provides a stunning visual contrast against the dark, obsidian-hued chocolate base.
- Textural Harmony: By adding chopped roasted peanuts and flaky sea salt, we balance the “gooey” factor with essential crunch and savory notes.
- Ultra-Moist Center: This recipe relies on a high fat-to-flour ratio, ensuring the center remains fudgy long after the brownies have cooled.
The Essential Components for Decadent Brownies
Unsalted Butter: 1 cup (225g). Using unsalted butter allows us to control the exact sodium level, ensuring the flaky salt on top provides the primary savory hit.
Granulated Sugar: 1 ½ cups (300g). Sugar is the secret to the crinkle top; as it dissolves and bonds with the egg proteins, it creates that shiny meringue-like layer.
Large Eggs: 3 units. Eggs provide the structural integrity and the “lift” needed for a thick brownie without making it cakey.
Pure Vanilla Extract: 1 tbsp (15ml). A heavy hand with vanilla enhances the floral notes of the cocoa powder and the richness of the peanut butter.
Dutch-Processed Cocoa Powder: ¾ cup (75g). Dutch-process cocoa is treated with alkali, giving it a darker color and a smoother, more intense chocolate flavor than natural cocoa.
All-Purpose Flour: ½ cup (64g). We use a surprisingly small amount of flour to keep the density high and the texture “ultra-fudgy.”
Creamy Peanut Butter: ½ cup (125g). Select a high-quality, stabilized creamy peanut butter to ensure the swirl stays glossy and doesn’t separate during the bake.
Roasted Peanuts: ¼ cup (35g). Finely chopped peanuts add the necessary textural “snap” that complements the soft chocolate base.
Flaky Sea Salt: 1 tsp (5g). This is the finishing touch that bridges the gap between the sweet chocolate and the savory peanut butter.
Professional Tools for the Perfect Bake
To achieve the results seen in our classic fudgy brownie collection, you will need an 8×8 inch (20x20cm) square baking pan. Lining this pan with parchment paper with a 2-inch overhang is non-negotiable for easy removal and clean, sharp edges.
A sturdy balloon whisk is essential for the egg-sugar aeration phase, while a silicone spatula will help you fold the dry ingredients without overworking the gluten. For the peanut butter swirl, a simple butter knife or a small offset spatula will create those elegant, glossy ribbons.

The Science of the Swirl: Step-by-Step Instructions
Phase 1: Achieving the Shiny Crinkle Foundation
Preheat your oven to 350°F (175°C). In a large microwave-safe bowl, melt your 1 cup (225g) of butter until it is liquid and warm. Immediately whisk in the 1 ½ cups (300g) of sugar; the heat of the butter helps dissolve the sugar, which is the first step toward that shiny crust.
Add the 3 large eggs one at a time, whisking vigorously for at least 2 full minutes after the last egg is added. You are looking for the “ribbon stage”—where the mixture becomes pale, thick, and falls off the whisk in slow, heavy folds. This aeration is what creates the “meringue” top seen in our holiday brownie variations.
Phase 2: Incorporating the Dark Chocolate Base
Gently fold in the 1 tbsp (15ml) of vanilla extract. Sift in the ¾ cup (75g) of cocoa powder and the ½ cup (64g) of all-purpose flour. Using a sifter ensures no clumps of cocoa remain, which can lead to bitter pockets in the final bake.
Fold the mixture until just combined. Over-mixing at this stage will develop the gluten, turning your fudgy masterpiece into something closer to a muffin. If you enjoy a denser texture, similar to a no-bake chocolate peanut butter dessert, keep the mixing to a bare minimum.
Phase 3: The Peanut Butter Ribbon Technique
Pour the chocolate batter into your prepared 8×8 inch pan and smooth the top. In a small bowl, warm the ½ cup (125g) of peanut butter in the microwave for 15 seconds until it is slightly fluid. Drop large dollops of peanut butter across the surface of the brownie batter.
Using a butter knife, swirl the peanut butter through the top layer of the chocolate batter. Use a “figure-eight” motion, ensuring you leave thick, glossy ribbons visible on the surface. Do not over-swirl, or the peanut butter will simply disappear into the batter.
Phase 4: Finishing Touches and the Bake
Sprinkle the ¼ cup (35g) of chopped roasted peanuts and the 1 tsp (5g) of flaky sea salt evenly over the top. This adds the visual markers of a professional peanut butter brownie recipe. Bake for 28-32 minutes.
The brownies are done when the edges are set and the center no longer jiggles, but a toothpick inserted into the middle still comes out with “moist crumbs” attached. If the toothpick is clean, they are overbaked!
Expert Tips for Bakery-Quality Results
- The Temperature Rule: Always use room temperature eggs. Cold eggs will seize the melted butter, preventing the sugar from dissolving properly and ruining your crinkle top.
- The Pan Choice: Use a metal baking pan rather than glass. Metal conducts heat more efficiently, leading to better-defined edges and a more even “fudge” throughout.
- The Cooling Patience: You must let these cool completely in the pan for at least 2 hours. This allows the fats to set, creating that incredibly moist, gooey center showcased in our marshmallow-topped brownies.
- Clean Slices: For perfectly clean squares, wipe your knife with a warm, damp cloth between every single cut.
Storage, Reheating, and Freezing Advice
To maintain the integrity of the peanut butter brownie recipe, store leftovers in an airtight container at room temperature for up to 4 days. If you prefer an extra-fudgy texture, keep them in the refrigerator; the cold firms up the butter and cocoa solids for a truffle-like consistency.
To reheat, place a brownie in the microwave for exactly 10 seconds. This will revive the “warm gooey peanut butter swirl” without melting the entire structure. For long-term storage, wrap individual squares in plastic wrap and freeze for up to 3 months.
What to Serve With Indulgent Peanut Butter Brownies
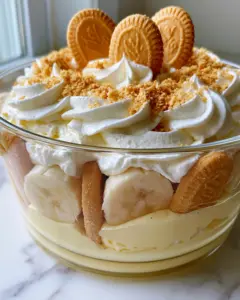
While these are a standalone powerhouse, they pair beautifully with other classic treats. If you are hosting a dessert party, consider serving these alongside a creamy banana pudding or a slice of Skrewball peanut butter pie for a full nut-themed spread.
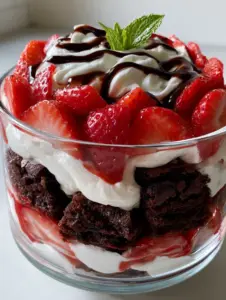
For a refreshing contrast, a dollop of whipped cream or a drizzle of homemade strawberry sauce provides a “PB&J” inspired flavor profile that guests love. These also crumble perfectly into a brownie trifle for a high-impact presentation.
Frequently Asked Questions
Yes, you can substitute the all-purpose flour with a 1:1 gluten-free baking flour blend. Since the flour content is low, the texture remains very similar.
It is best to use a stabilized, creamy peanut butter. Natural peanut butters that require stirring often separate when baked, which can make the swirl greasy rather than glossy.
The shiny top is created by dissolving sugar into warm butter and whisking the eggs vigorously. This creates a thin layer of meringue that rises to the surface during baking.
Absolutely. Fudgy brownies need time to set their internal structure. Cutting them while warm will result in a messy, though delicious, pile rather than clean squares.
Cakey brownies usually result from over-mixing the flour or using too many eggs. To keep them fudgy, fold the dry ingredients until just combined and ensure you don’t overbake.
The Ultimate Peanut Butter Brownie Recipe Card

Peanut Butter Brownie Recipe: The Ultimate Ultra-Fudgy Swirl with a Shiny Crinkle Top
Ingredients
Equipment
Method
- Whisk melted butter and sugar together, then add eggs one at a time, whisking for 2 minutes until thick and pale.
- Gently fold in cocoa powder, flour, and vanilla until just combined to keep the fudgy texture.
- Pour batter into pan. Dollop peanut butter on top and use a knife to create a glossy swirl ribbon.
- Sprinkle with peanuts and sea salt. Bake for 30 minutes until the shiny crinkle top forms.
Notes
Use a metal pan for even heat conduction.

Closing & Call to Action
This peanut butter brownie recipe is the perfect marriage of salty and sweet, crunchy and gooey. By following the aeration techniques and the precise swirling method, you can recreate this bakery-style masterpiece in your own kitchen. Whether it’s for a holiday party or just a weekend treat, these brownies never fail to impress.
If you made this recipe, please leave a comment below and tell us how your crinkle top turned out! Don’t forget to share your photos and follow us on Pinterest for more decadent dessert inspiration.