There is a specific kind of culinary magic that happens when the saltiness of roasted peanuts meets the deep, sultry notes of dark chocolate. This no-bake chocolate peanut butter dessert is the ultimate manifestation of that harmony. It’s a dish designed for the senses, featuring a dense, buttery graham cracker foundation that supports a cloud-like whipped mousse, all crowned with a mirror-glaze ganache.
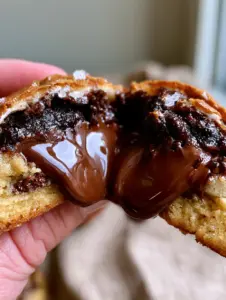
Imagine sliding your fork through a glossy, rich dark chocolate layer that gives way to an ultra-creamy peanut butter center. The visual of the ganache slightly dripping down the cut edge, as seen in our latest kitchen captures, is enough to make any dessert lover swoon. It is the perfect centerpiece for those who want a high-end pastry shop result without ever turning on the oven.
Whether you are preparing for a summer gathering or simply need a reliable indulgence to keep in the fridge, this recipe delivers on every front. It’s structurally sound enough to slice into perfect, sharp squares while remaining soft enough to melt on your tongue. Let’s dive into how we achieve this multi-layered masterpiece.

The Anatomy of a Perfect Layered Indulgence
- Dense Structural Base: A foundation of pressed graham cracker crumbs that provides a necessary crunch and buttery saltiness to balance the sweet layers above.
- Whipped Mousse Texture: Unlike heavy fudge-style fillings, this peanut butter layer is aerated to create a light, melt-in-your-mouth experience.
- High-Gloss Finish: A dark chocolate ganache formulated for a professional sheen that stays soft enough to bite through without cracking.
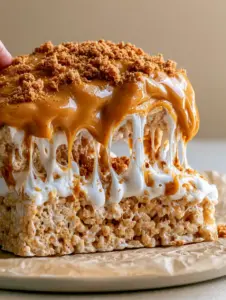
- Visual Garnish Cues: A delicate swirl of warm peanut butter and a scattering of toasted nuts provide the textural contrast that elevates this from a simple bar to a gourmet dessert.
Essential Components for This No-Bake Masterpiece
Every ingredient in this no-bake chocolate peanut butter dessert serves a functional purpose. We aren’t just looking for flavor; we are looking for the chemical reactions that allow a no-bake dessert to hold its shape at room temperature.
Graham Cracker Crumbs (2 cups / 200g): These provide the structural integrity of the base. Ensure they are finely ground to a “sandy” texture to absorb the butter evenly.
Unsalted Butter (1/2 cup / 115g): When melted and then chilled, the butter acts as the “glue” for your crust. We use unsalted to maintain complete control over the final flavor profile.
Creamy Peanut Butter (1.5 cups / 380g): For the filling, a standard processed peanut butter (like Jif or Skippy) works best for stability. Natural oils in artisanal brands can sometimes cause the mousse to separate.
Cream Cheese (8 oz / 225g): This is our secret “invisible” ingredient. It provides a slight tang to cut through the sugar and ensures the filling has enough body to be sliced cleanly.
Powdered Sugar (1.5 cups / 180g): Also known as confectioners’ sugar, this sweetens the filling while the cornstarch within the sugar helps stabilize the whipped cream. If you love this flavor profile, you might also enjoy our creamy peanut butter cheesecake.
Heavy Whipping Cream (1.5 cups / 360ml): Divided between the filling and the ganache. When whipped into the peanut butter, it creates that signature “mousse” airiness seen in professional photography.
Dark Chocolate Chips (1 cup / 175g): We recommend a 60% cacao content. This bitterness is vital for balancing the sweetness of the peanut butter layer.
Toasted Peanuts & Flaky Sea Salt: These are the “finishing touches.” The salt pulls out the hidden notes of the chocolate, while the peanuts provide a necessary olfactory cue of “roasted goodness.”
Tools for Professional Results
To achieve the sharp edges and perfectly layered look of this dessert, a few specific tools are required. First, a 9×9 inch square baking pan is ideal for getting the thickness shown in our visual guide. Using a pan that is too large will result in thin, unappealing layers.
An offset spatula is your best friend for the filling and ganache. It allows you to smooth the top of each layer without your knuckles touching the delicate surface. For the whipped filling, a stand mixer or electric hand mixer is non-negotiable to achieve the necessary volume in the heavy cream.
Finally, parchment paper with an “overhang” (sling method) is essential. This allows you to lift the entire chilled block out of the pan for clean, precise slicing on a cutting board.
Building the Buttery Graham Cracker Foundation
Step 1: Crumb Preparation and Binding
In a medium bowl, combine your 2 cups (200g) of graham cracker crumbs with 1/4 cup (50g) of granulated sugar. Pour in the 1/2 cup (115g) of melted unsalted butter. Use a fork to toss the mixture until it looks like wet sand and holds together when pinched.
Step 2: The Precision Press
Transfer the mixture to your lined pan. Use the bottom of a flat measuring cup to press the crumbs firmly into the bottom. Pay special attention to the corners; a well-compacted base is the secret to a dessert that doesn’t crumble when served. Chill this in the freezer for 15 minutes while you prepare the next layer.
Creating the Ultra-Creamy Peanut Butter Mousse
Step 3: Creaming the Base
In a large bowl, beat the 8 oz (225g) of softened cream cheese and 1.5 cups (380g) of creamy peanut butter until completely smooth. There should be no visible lumps of cream cheese. Slowly sift in the 1.5 cups (180g) of powdered sugar and 1 tsp (5ml) of vanilla extract, mixing until incorporated.
Step 4: Folding for Aeration
In a separate chilled bowl, whip 1 cup (240ml) of the heavy cream until stiff peaks form. Gently fold the whipped cream into the peanut butter mixture using a rubber spatula. Do not stir vigorously, or you will deflate the air you just worked so hard to incorporate. The result should be a thick, pale, and fluffy mousse.
Step 5: Leveling the Layer
Spread the mousse over the chilled crust. Use your offset spatula to create a perfectly level surface. This is critical for ensuring the ganache sits evenly on top later. This technique is similar to what we use in our skrewball peanut butter pie for that silk-like finish.

Mastering the Glossy Dark Chocolate Ganache
Step 6: The Emulsion Process
Place your 1 cup (175g) of dark chocolate chips in a heat-proof bowl. In a small saucepan, heat the remaining 1/2 cup (120ml) of heavy cream until it just begins to simmer (do not let it reach a rolling boil). Pour the hot cream over the chocolate and let it sit undisturbed for 5 minutes.
Step 7: Stirring to a Mirror Finish
Starting from the center of the bowl, whisk in small concentric circles. Watch as the mixture transforms from muddy and separated to a dark, high-gloss liquid. Once smooth, pour it immediately over the peanut butter layer. Tilt the pan gently to allow the ganache to flow to the edges naturally.
The Final Flourish: Garnishing for Visual Impact
Step 8: The Peanut Butter Drizzle
Melt 2 tbsp (32g) of peanut butter in the microwave for 20 seconds until fluid. Using a spoon, drizzle it in a delicate zigzag or swirl pattern over the still-wet ganache. This creates the “artisan” look found in our visual recipe blueprint.
Step 9: Textural Toppings
While the ganache is still tacky, scatter the 1/4 cup (30g) of finely chopped toasted peanuts across the top. Finish with a light sprinkle of flaky sea salt. The salt is a crucial sensory cue; it sparkles under the light and promises a complex flavor profile. If you’re looking for more entertaining ideas, check out our summer party planning guide.
Expert Tips for the Ultimate No-Bake Success
- The Temperature Trick: Ensure your cream cheese is truly room temperature before mixing, but your heavy cream is ice cold. This juxtaposition ensures the smoothest texture and the best volume.
- Clean Slices: To get the “macro shot” quality slices seen in our photos, run a sharp chef’s knife under hot water, wipe it dry, and make one clean cut. Repeat the cleaning/heating process for every single slice.
- Chilling is Non-Negotiable: This dessert needs at least 4 hours—or preferably overnight—to set. The fats in the peanut butter and chocolate need time to re-solidify to create that “dripping but stable” edge.
- Salt Selection: Use Maldon or a similar flaky sea salt. Table salt is too fine and will simply make the dessert taste salty rather than providing those intentional bursts of flavor contrast.
The Best Way to Store and Serve
This no-bake chocolate peanut butter dessert should always be stored in the refrigerator. Because of the high dairy content in the mousse and ganache, it can soften significantly if left at room temperature for more than 45 minutes.
To Freeze: This dessert freezes beautifully. Wrap the entire block (or individual squares) in plastic wrap and then foil. It will stay fresh for up to 3 months. Thaw in the refrigerator for 2 hours before serving to maintain the creamy mousse texture. This makes it a great addition to your no-bake holiday recipes repertoire.
What to Pair with This Decadent Treat
Because this dessert is so rich, it pairs best with beverages that offer high acidity or bitterness to cleanse the palate. A dark roast coffee or a double espresso is the traditional choice. For a more adventurous pairing, try serving it alongside a glass of milk or even a salty snack platter.
If you are hosting a larger event, consider serving these squares alongside lighter options like fruit skewers or our marshmallow peanut butter brownies for a full peanut-butter-themed dessert bar.
Frequently Asked Questions
Absolutely. Simply swap the standard graham cracker crumbs for a gluten-free graham cracker alternative. The rest of the ingredients are naturally gluten-free.
It is not recommended. Natural peanut butter often separates, which can cause the whipped mousse layer to become oily or collapse. Stick to processed creamy peanut butter for the best structural stability.
Yes, it must be kept refrigerated. The whipped cream and cream cheese in the mousse layer will soften significantly at room temperature, making it difficult to slice.
The secret is the emulsion. Ensure your cream is just simmering, and let it sit on the chocolate for a full 5 minutes before whisking gently from the center outward to avoid creating air bubbles.
For the best results, chill the dessert for at least 4 hours. Chilling it overnight is even better, as it allows the flavors to meld and the base to fully firm up.
The Ultimate No-Bake Chocolate Peanut Butter Dessert Recipe Card

No-Bake Chocolate Peanut Butter Dessert with Ganache and Sea Salt
Ingredients
Equipment
Method
- Combine crumbs, sugar, and melted butter. Press firmly into a lined 9x9 pan. Freeze for 15 minutes.
- Beat peanut butter, cream cheese, and powdered sugar. In a separate bowl, whip heavy cream to stiff peaks, then fold into peanut butter mixture. Spread over crust.
- Pour hot heavy cream over chocolate chips. Let sit for 5 mins, then whisk until glossy. Pour over filling.
- Drizzle with melted peanut butter, sprinkle with chopped peanuts and sea salt. Chill for at least 4 hours.
Notes
For clean slices, dip your knife in hot water and wipe dry between cuts.

Bring the Bakery Home Today
This no-bake chocolate peanut butter dessert is more than just a sweet treat; it’s a masterclass in texture and visual appeal. From the crunch of the toasted peanuts to the velvet-smooth ganache, every bite is a reminder of why this flavor combination remains the king of the dessert world.
We would love to see your creations! If you make this recipe, please leave a comment below and let us know how your layers turned out. Don’t forget to follow us and save this recipe to your favorite boards on Pinterest so you never lose track of this indulgent classic.