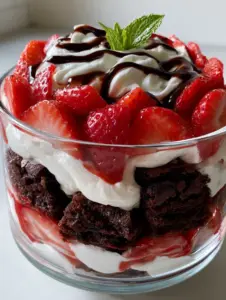
There is a specific kind of magic that happens when deep, dark chocolate meets the salty-sweet allure of peanut butter and the nostalgic, pillowy pull of toasted marshmallow fluff. These Marshmallow Peanut Butter Brownies are not just a dessert; they are a multi-sensory experience designed for the true indulgence seeker. From the very first glance, you are greeted by a dense, ultra-fudgy foundation that promises visible moisture and a rich cocoa intensity that lingers on the palate.
Imagine pulling a square from the pan and witnessing a dramatic, gooey marshmallow pull, complete with those delicate, webbed strands that signify a perfectly warmed center. The top is a landscape of golden-brown blistered charred spots, achieved by precisely toasting the fluff until it reaches a campfire-perfect finish. Whether you are making these for a holiday gathering or a quiet night in, the glossy dark chocolate drizzle and a whisper of flaky sea salt make these brownies look like they stepped straight out of a professional patisserie.
The beauty of this recipe lies in the contrast. You have the weight of the dark chocolate, the creamy viscosity of the peanut butter swirls, and the airy, sticky lightness of the toasted marshmallow fluff. It is a harmonious balance that elevates the humble brownie into something truly extraordinary. If you have ever enjoyed a classic peanut butter brownie, prepare to have your expectations completely redefined by this marshmallow-topped evolution.

Why These Decadent Brownies are the Ultimate Crowd-Pleaser
- The Texture Trifecta: You get the dense, moisture-rich “fudge” factor from the brownie base, the silky glide of creamy peanut butter, and the elastic, airy chew of toasted marshmallow fluff.
- Visual Showstopper: With a glossy dark chocolate drizzle and perfect golden-brown charred spots, these brownies are designed to be the centerpiece of any dessert table.
- The Sweet and Salty Edge: The inclusion of a thick peanut butter swirl and a final sprinkle of flaky sea salt crystals cuts through the richness of the dark chocolate.
- Gourmet Presentation: The dramatic “marshmallow pull” makes every serving feel like a special occasion, reminiscent of professional s’mores-inspired desserts.
The Essential Pantry Staples for Decadent Brownies
Unsalted Butter (1 cup / 225g): This is the fat source that provides the foundational richness. We melt it together with the chocolate to ensure a seamless, fudgy crumb rather than a cakey one.
Bittersweet Chocolate (8 oz / 225g): Using a high-quality bar with at least 60% cacao ensures that the “dark chocolate brownie base” has that intense, sophisticated bitterness to balance the sugar.
Granulated Sugar (1.5 cups / 300g): Sugar does more than sweeten; it breaks down the protein in the eggs to create that iconic crackly brownie top and keeps the center moist.
Large Eggs (3): These provide the necessary structure and lift. When beaten well, they incorporate air that helps create the glossy, paper-thin top layer of the brownie foundation.
Dutch-Process Cocoa Powder (1/4 cup / 25g): This specific cocoa is treated with alkali, giving the brownies their signature “ultra-fudgy dark chocolate” appearance and a smoother flavor profile.
Creamy Peanut Butter (1/2 cup / 125g): For the best “thick, glossy, golden-brown peanut butter layer,” use a standard creamy variety rather than natural oil-separating types to ensure a stable swirl.
Marshmallow Fluff (1.5 cups / approx 100g): This is the secret to the marshmallow pull. It stays soft and gooey even after cooling, unlike traditional marshmallows which can become chewy or tough.
Dark Chocolate Fudge Sauce (1/4 cup / 60ml): This is used for the “glossy dark chocolate drizzle” that glistens under the light and adds a final layer of velvet texture.
Flaky Sea Salt: A tiny pinch of these crystals is the “culinary forensic” finish that wakes up the taste buds and emphasizes the peanut butter notes.
Professional Tools for a Flawless Finish
To achieve the visual perfection seen in our blueprint, you will need an 8×8 inch (20x20cm) square baking pan lined with parchment paper. The parchment is non-negotiable, as it allows you to lift the entire block out for clean slicing and that perfect “macro close-up” side view. A kitchen torch is highly recommended for achieving those “perfect golden-brown blistered charred spots” on the marshmallow fluff without overcooking the brownie base. If you don’t have a torch, a carefully monitored broiler session will work, but the torch offers more precision for that handcrafted look.
Mastering the Ultra-Fudgy Dark Chocolate Foundation
Step 1: Melting the Chocolate Base
In a medium heat-proof bowl, combine your 1 cup (225g) of unsalted butter and 8 oz (225g) of chopped bittersweet chocolate. Set this over a pot of simmering water (a double boiler) or microwave in 30-second bursts, stirring until the mixture is glossy and completely smooth. This method prevents the chocolate from seizing and ensures a dense, moisture-rich foundation.
Step 2: Aerating the Eggs and Sugar
In a separate large bowl, whisk the 1.5 cups (300g) of sugar and 3 large eggs vigorously for about 2-3 minutes. You are looking for a pale, ribon-like consistency. This step is the secret to getting that thin, shiny “skin” on the brownie that sits just beneath the peanut butter and marshmallow layers.
Step 3: Folding the Dry Ingredients
Gently fold the melted chocolate mixture into the eggs. Sift in 3/4 cup (95g) of all-purpose flour, 1/4 cup (25g) of Dutch-process cocoa, and 1/2 tsp (3g) of fine salt. Use a spatula to fold until no streaks of flour remain. The batter should be thick, dark, and incredibly fragrant.

Creating the Signature Peanut Butter Swirl and Marshmallow Pull
Step 4: The Peanut Butter Ribboning
Pour the brownie batter into your prepared pan. Warm the 1/2 cup (125g) of creamy peanut butter in the microwave for 15 seconds until it is pourable. Drop large spoonfuls onto the batter and use a butter knife to swirl it in. Aim for thick ribbons rather than fully mixing it; this ensures the “thick, glossy, golden-brown peanut butter layer” is visible in every slice.
Step 5: Baking to Fudgy Perfection
Bake at 350°F (175°C) for 25-30 minutes. The key sensory cue here is the “jiggle.” The edges should be set, but the center should still have a slight movement. Overbaking will destroy the moisture we worked so hard to build. Let the brownies cool for at least 20 minutes before the next step.
Step 6: Toasting the Pillowy Marshmallow Fluff
Spread the marshmallow fluff over the warm brownies. Using a kitchen torch, move the flame constantly to create those “perfect golden-brown blistered charred spots.” If using a broiler, place the pan on the top rack for only 30-60 seconds—do not look away! You want the marshmallow to be toasted on top but gooey enough to create those “delicate webbed strands” when sliced.
Step 7: The Final Garnish
Once toasted, take your dark chocolate fudge sauce and create a “rich, glossy dark chocolate drizzle” across the top. Finally, sprinkle with a pinch of flaky sea salt crystals. The salt should catch the light, sitting atop the dark drizzle like tiny diamonds.
Expert Tips for Bakery-Style Results
- The Hot Knife Trick: For those perfectly clean “extreme macro” slices, run a large chef’s knife under hot water and wipe it dry before every single cut. This prevents the marshmallow fluff from sticking and tearing.
- Don’t Skip the Sifting: Dutch-process cocoa is notorious for clumping. Sifting ensures a smooth batter and a consistent dark chocolate brownie base.
- Room Temperature Eggs: This helps the eggs emulsify better with the fats, leading to a more stable structure that can support the weight of the marshmallow and peanut butter.
- The Cooling Rule: While the “marshmallow pull” is best when warm, the brownie foundation needs time to set. Let them rest for 1 hour before the final toast for the best structural integrity.
Storage, Reheating, and Keeping the Gooeyness
Marshmallow Peanut Butter Brownies are best enjoyed within 48 hours for the ultimate texture. Store them in an airtight container at room temperature; refrigerating them can make the fudgy base too hard and the marshmallow fluff lose its airy quality. If you want to revive that “warm marshmallow pull” the next day, simply pop a square in the microwave for 8-10 seconds. This will soften the peanut butter and make the marshmallow webbed and stretchy again.
What to Serve With These Decadent Bars
Because these brownies are incredibly rich, they pair beautifully with a cold glass of milk or a strong espresso. If you are serving these as part of a larger dessert spread, they complement other peanut-themed treats like a creamy peanut butter cheesecake or a slice of Skrewball peanut butter pie. For a lighter contrast, serve them alongside some fresh berries or a scoop of vanilla bean ice cream.
Frequently Asked Questions
You can freeze the brownie base with the peanut butter swirl, but we recommend adding the marshmallow fluff and toasting it fresh. Marshmallow fluff does not thaw well and can become grainy or excessively sticky in the freezer.
While you can use regular marshmallows, they tend to become tough or chewy once they cool. Marshmallow fluff stays soft and provides that iconic ‘webbed strand’ marshmallow pull even at room temperature.
You can use your oven’s broiler. Place the brownies on the top rack for 30-60 seconds. Watch them very closely, as the sugar in the fluff can go from golden to burnt in seconds.
To get clean slices through the sticky marshmallow, use a hot, wet knife. Wipe the knife clean and re-dip it in hot water between every single cut.
Cakey brownies usually result from over-mixing the flour or using too many eggs. To keep them ultra-fudgy, fold the dry ingredients in gently and ensure you don’t overbake them—the center should still jiggle slightly when you pull them out.
The Official Marshmallow Peanut Butter Brownies Recipe

Marshmallow Peanut Butter Brownies: The Ultimate Fudgy, Gooey, and Toasted Masterpiece
Ingredients
Equipment
Method
- Preheat oven to 350°F (175°C). Line an 8x8 inch pan with parchment paper, leaving an overhang on two sides.
- Melt butter and bittersweet chocolate in a double boiler until glossy and smooth.
- Whisk sugar and eggs for 2-3 minutes until pale and ribbon-like. Stir in vanilla.
- Fold melted chocolate into the egg mixture. Gently fold in flour, cocoa powder, and salt until just combined.
- Pour batter into pan. Drop dollops of peanut butter and swirl with a knife to create thick ribbons.
- Bake for 25-30 minutes until the edges are set but the center still has a slight jiggle. Cool for 20 minutes.
- Spread marshmallow fluff over the brownies. Use a kitchen torch to create golden-brown charred spots.
- Drizzle with dark chocolate sauce and sprinkle with flaky sea salt. Slice while warm for the best marshmallow pull.
Notes
Dutch-process cocoa is essential for the dark chocolate color.
Unlock More Indulgent Baking Secrets
If you loved making these Marshmallow Peanut Butter Brownies, your journey into decadent baking is just beginning. Whether you’re looking for more brownie variations or fun seasonal ideas like Halloween treats, there is always something new to whip up. Don’t forget to share your gooey marshmallow pull photos and tag us!
For more inspiration and to see the step-by-step videos of these brownies in action, follow us on Pinterest. Join our community of home cooks and never miss a decadent recipe again!

—